· Nacho Coll · Comparisons · 13 min read
Pinata to IPFS.NINJA: Step-by-Step Migration Guide (2026)
Migrate your CIDs from Pinata to IPFS.NINJA without downtime. Bulk re-pin script, API endpoint swap, gateway URL changes, and rollback plan. For existing Pinata customers.
Pinata to IPFS.NINJA: Step-by-Step Migration Guide (2026)
This is a migration runbook for existing Pinata customers, not a head-to-head feature comparison. If you’re still deciding between providers, read IPFS.NINJA vs Pinata first. The guide below assumes you’ve already decided to move your pins.
The migration is four concrete steps, takes ~30 minutes for a typical account, and your existing CIDs don’t change — only the service pinning them does. Your NFT metadata, dApp configs, and IPNS records all continue to resolve.
What changes vs what stays the same
| What | Migration impact |
|---|---|
| Your CIDs | ✅ Unchanged. A CID is a hash of the content; it doesn’t belong to a provider. |
ipfs:// URIs in smart contracts | ✅ Unchanged. No re-mint needed. |
| Gateway URLs in dApps / docs | ⚠ Change: gateway.pinata.cloud → <slug>.gw.ipfs.ninja (or ipfs.ninja) |
| API endpoint | ⚠ Change: api.pinata.cloud → api.ipfs.ninja |
| API authentication | ⚠ Change: JWT bearer → X-Api-Key: bws_<32hex> header |
| Pinning policy | ✅ Same: HTTPS REST, idempotent on CID |
| Custom metadata fields | ⚠ Re-mapped: Pinata pinataMetadata.keyvalues → IPFS.NINJA top-level metadata: {} |
Step 1 — Inventory your Pinata pins
You need three things from Pinata before cutting over:
# Auth header used in all examples below
export PINATA_JWT="eyJ..."           # from Pinata dashboard → API Keys

# Total pin count + paginated CID list
curl -s "https://api.pinata.cloud/data/pinList?status=pinned&pageLimit=1000" \
  -H "Authorization: Bearer $PINATA_JWT" \
  | jq '.rows[] | {cid: .ipfs_pin_hash, name: .metadata.name, size: .size}' \
  > pinata-inventory.jsonl

wc -l pinata-inventory.jsonl   # this is your migration size
Pinata returns up to 1000 rows per page. If count in the response exceeds 1000, paginate with pageOffset. The output file pinata-inventory.jsonl is the source of truth for everything below — keep it until cutover is verified.
Step 2 — Re-pin every CID via the IPFS.NINJA API
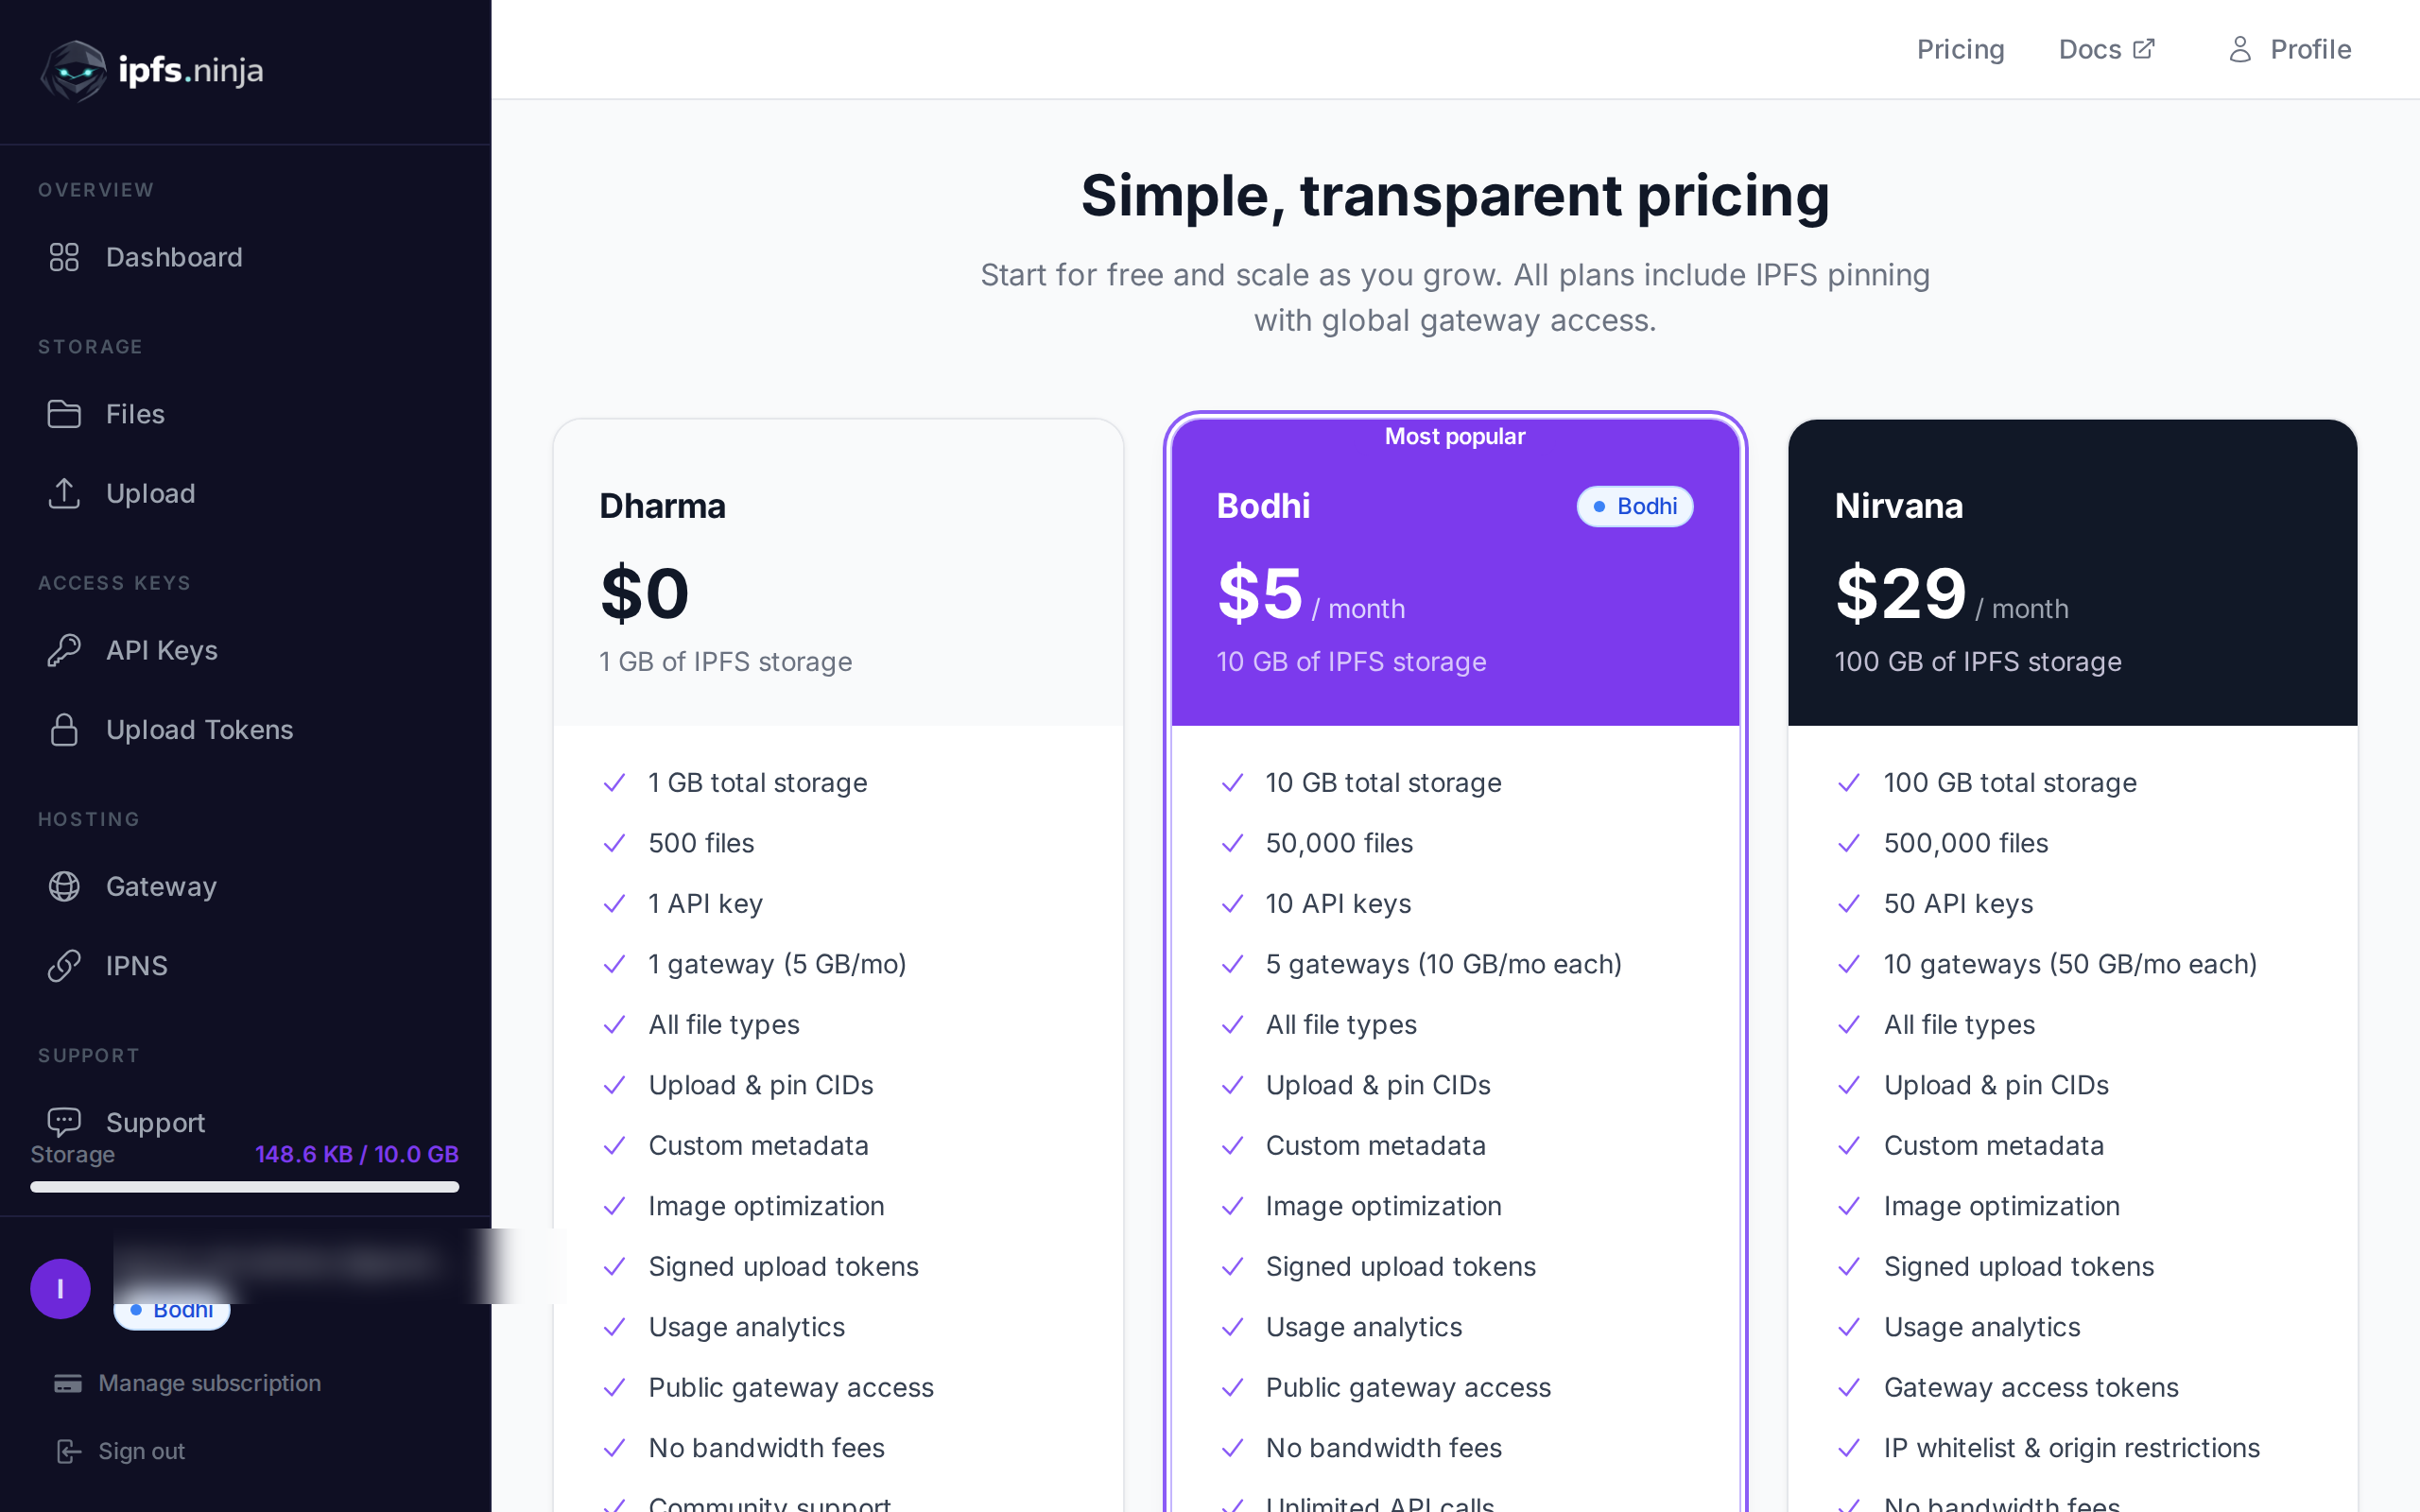
Get your IPFS.NINJA key from the dashboard (free Dharma plan covers 50 files / 1 GB; Bodhi at $5/mo handles 200 / 10 GB). Then re-pin idempotently:
export NINJA_KEY="bws_1234567890abcdef1234567890abcdef"

# Idempotent — re-pinning a CID we already hold is a no-op + 200 OK
jq -r '.cid' pinata-inventory.jsonl | while read cid; do
  curl -s -X POST https://api.ipfs.ninja/pin \
    -H "X-Api-Key: $NINJA_KEY" \
    -H "Content-Type: application/json" \
    -d "{\"cid\":\"$cid\",\"description\":\"migrated from pinata\"}" \
    | jq -c "{cid: .cid, status: .status}"
done | tee migration-log.jsonl
Pinning is asynchronous for any CID our cluster doesn’t already hold — the response returns status: "pinning". Poll GET /pin/{cid} until status flips to "pinned", or wait ~5 minutes for typical mid-sized content.
Cost watch: running this loop against a 50,000-CID Pinata account against a Karma-tier IPFS.NINJA account will pin everything successfully (file limit 1,000 — Karma plan accepts up to 1,000 standalone pins; large directories are accounted as one file). For accounts above 1k pins, contact us before running the loop or split across multiple accounts.
Step 3 — Swap gateway URLs in your app
The trickiest non-API change. Any gateway.pinata.cloud/ipfs/<cid> reference in your code, NFT metadata, or dApp config needs to point at an IPFS.NINJA gateway. Options:
# Pinata format
https://gateway.pinata.cloud/ipfs/QmXxx...

# IPFS.NINJA — public apex gateway (shared, free, rate-limited)
https://ipfs.ninja/ipfs/QmXxx...

# IPFS.NINJA — your dedicated gateway (Bodhi+, custom subdomain)
https://<your-slug>.gw.ipfs.ninja/ipfs/QmXxx...
For NFT metadata where ipfs:// URIs were used (the correct pattern), nothing changes — wallets and OpenSea resolve via their own gateways. For hardcoded HTTP gateway URLs in app code:
// Find/replace in your codebase
const PINATA = 'https://gateway.pinata.cloud/ipfs/';
const NINJA  = 'https://your-slug.gw.ipfs.ninja/ipfs/';

// Or environment-driven for canary rollouts
const gatewayBase = process.env.IPFS_GATEWAY_BASE || NINJA;
Recommended cutover pattern: deploy with IPFS_GATEWAY_BASE pointing at IPFS.NINJA but keep Pinata pinned in parallel for 7 days. Monitor your error rate and gateway latency; if anything regresses, flip the env var back. Only unpin from Pinata once you’ve verified a full week of stable serving on the new gateway.
Step 4 — Verify, then decommission Pinata
Before cancelling Pinata:
# Sanity-check that every CID in your inventory is now pinned on IPFS.NINJA
jq -r '.cid' pinata-inventory.jsonl | while read cid; do
  status=$(curl -s "https://api.ipfs.ninja/pin/$cid" \
    -H "X-Api-Key: $NINJA_KEY" | jq -r '.status')
  echo "$cid $status"
done | grep -v "pinned$" | tee missing.txt

# If missing.txt is empty, you're safe to unpin from Pinata.
Once missing.txt is empty and you’ve run the parallel-gateway period above, unpin from Pinata:
jq -r '.cid' pinata-inventory.jsonl | while read cid; do
  curl -X DELETE "https://api.pinata.cloud/pinning/unpin/$cid" \
    -H "Authorization: Bearer $PINATA_JWT"
done
Cancel your Pinata subscription only after all unpins return 200 — Pinata bills based on stored bytes, so any pins remaining when you cancel will count toward your final invoice.
Rollback plan
If anything blocks the cutover, every step above is reversible until you delete from Pinata:
- App pointing at the wrong gateway? Flip
IPFS_GATEWAY_BASEback to Pinata, no data loss. - IPFS.NINJA pinning hangs at
status: pinning? Pinata still has the CID, your dApp keeps serving. - Need more time? Both services charge by stored bytes per month — running in parallel for one extra month adds one extra Bodhi-tier charge ($5) and your Pinata bill stays whatever it was.
Only Step 4’s unpin loop is destructive, and it’s gated on missing.txt being empty. There’s no point where data is at risk.
API + gateway mapping reference (for find-and-replace)
| Pinata | IPFS.NINJA |
|---|---|
https://api.pinata.cloud/pinning/pinByHash | POST https://api.ipfs.ninja/pin |
https://api.pinata.cloud/pinning/pinFileToIPFS | POST https://api.ipfs.ninja/upload/new |
https://api.pinata.cloud/pinning/pinJSONToIPFS | POST https://api.ipfs.ninja/upload/new (Content-Type: application/json) |
https://api.pinata.cloud/data/pinList | GET https://api.ipfs.ninja/upload/list?from=1&to=<now> |
https://api.pinata.cloud/pinning/unpin/<cid> | DELETE https://api.ipfs.ninja/pin/<cid> |
Authorization: Bearer <jwt> | X-Api-Key: bws_<32hex> |
pinataMetadata.keyvalues (per-pin) | metadata: {} (per-pin, top-level) |
https://gateway.pinata.cloud/ipfs/<cid> | https://<slug>.gw.ipfs.ninja/ipfs/<cid> (dedicated) or https://ipfs.ninja/ipfs/<cid> (public) |
If your team is on Pinata Enterprise with custom gateway domains or Pinata Submarine (private pins), reach out before running Step 2 — we’ll walk you through the equivalent on IPFS.NINJA gateway access modes (open, restricted, token-required).
Feature Comparison: What You Get for Your Money
API Keys and Team Management
One area where IPFS Ninja shines is in team collaboration. Even the entry Bodhi plan includes 3 API keys, with Karma bumping to 10 and Nirvana to 50 — allowing you to:
- Separate keys for development, staging, and production
- Give team members their own keys with individual usage tracking
- Rotate keys for security without disrupting other environments
Pinata’s Pro plan provides multiple users, but API key management isn’t as granular.
Upload Tokens: Client-Side Security Done Right
One of IPFS Ninja’s standout features is signed upload tokens. These time-limited, revocable tokens let you safely upload files from client-side applications without exposing your main API key.
Here’s how simple it is to create and use upload tokens:
// Create an upload token (server-side)
const createToken = async () => {
  const response = await fetch('https://api.ipfs.ninja/upload-tokens', {
    method: 'POST',
    headers: {
      'Content-Type': 'application/json',
      'X-Api-Key': 'bws_1234567890abcdef1234567890abcdef'
    },
    body: JSON.stringify({
      name: 'Frontend Upload Token',
      expires: '2026-04-28T00:00:00Z',
      maxUploads: 100
    })
  });

  const { token } = await response.json();
  return token;
};

// Use the token client-side
const uploadWithToken = async (file, token) => {
  const response = await fetch('https://api.ipfs.ninja/upload/new', {
    method: 'POST',
    headers: {
      'Content-Type': 'application/json',
      'Authorization': `Signed ${token}`
    },
    body: JSON.stringify({
      content: await fileToBase64(file),
      description: file.name
    })
  });

  return await response.json();
};
This approach is much more secure than exposing your main API key in frontend applications, and it’s a feature that sets IPFS Ninja apart from many alternatives.
Multiple Gateways with Access Control
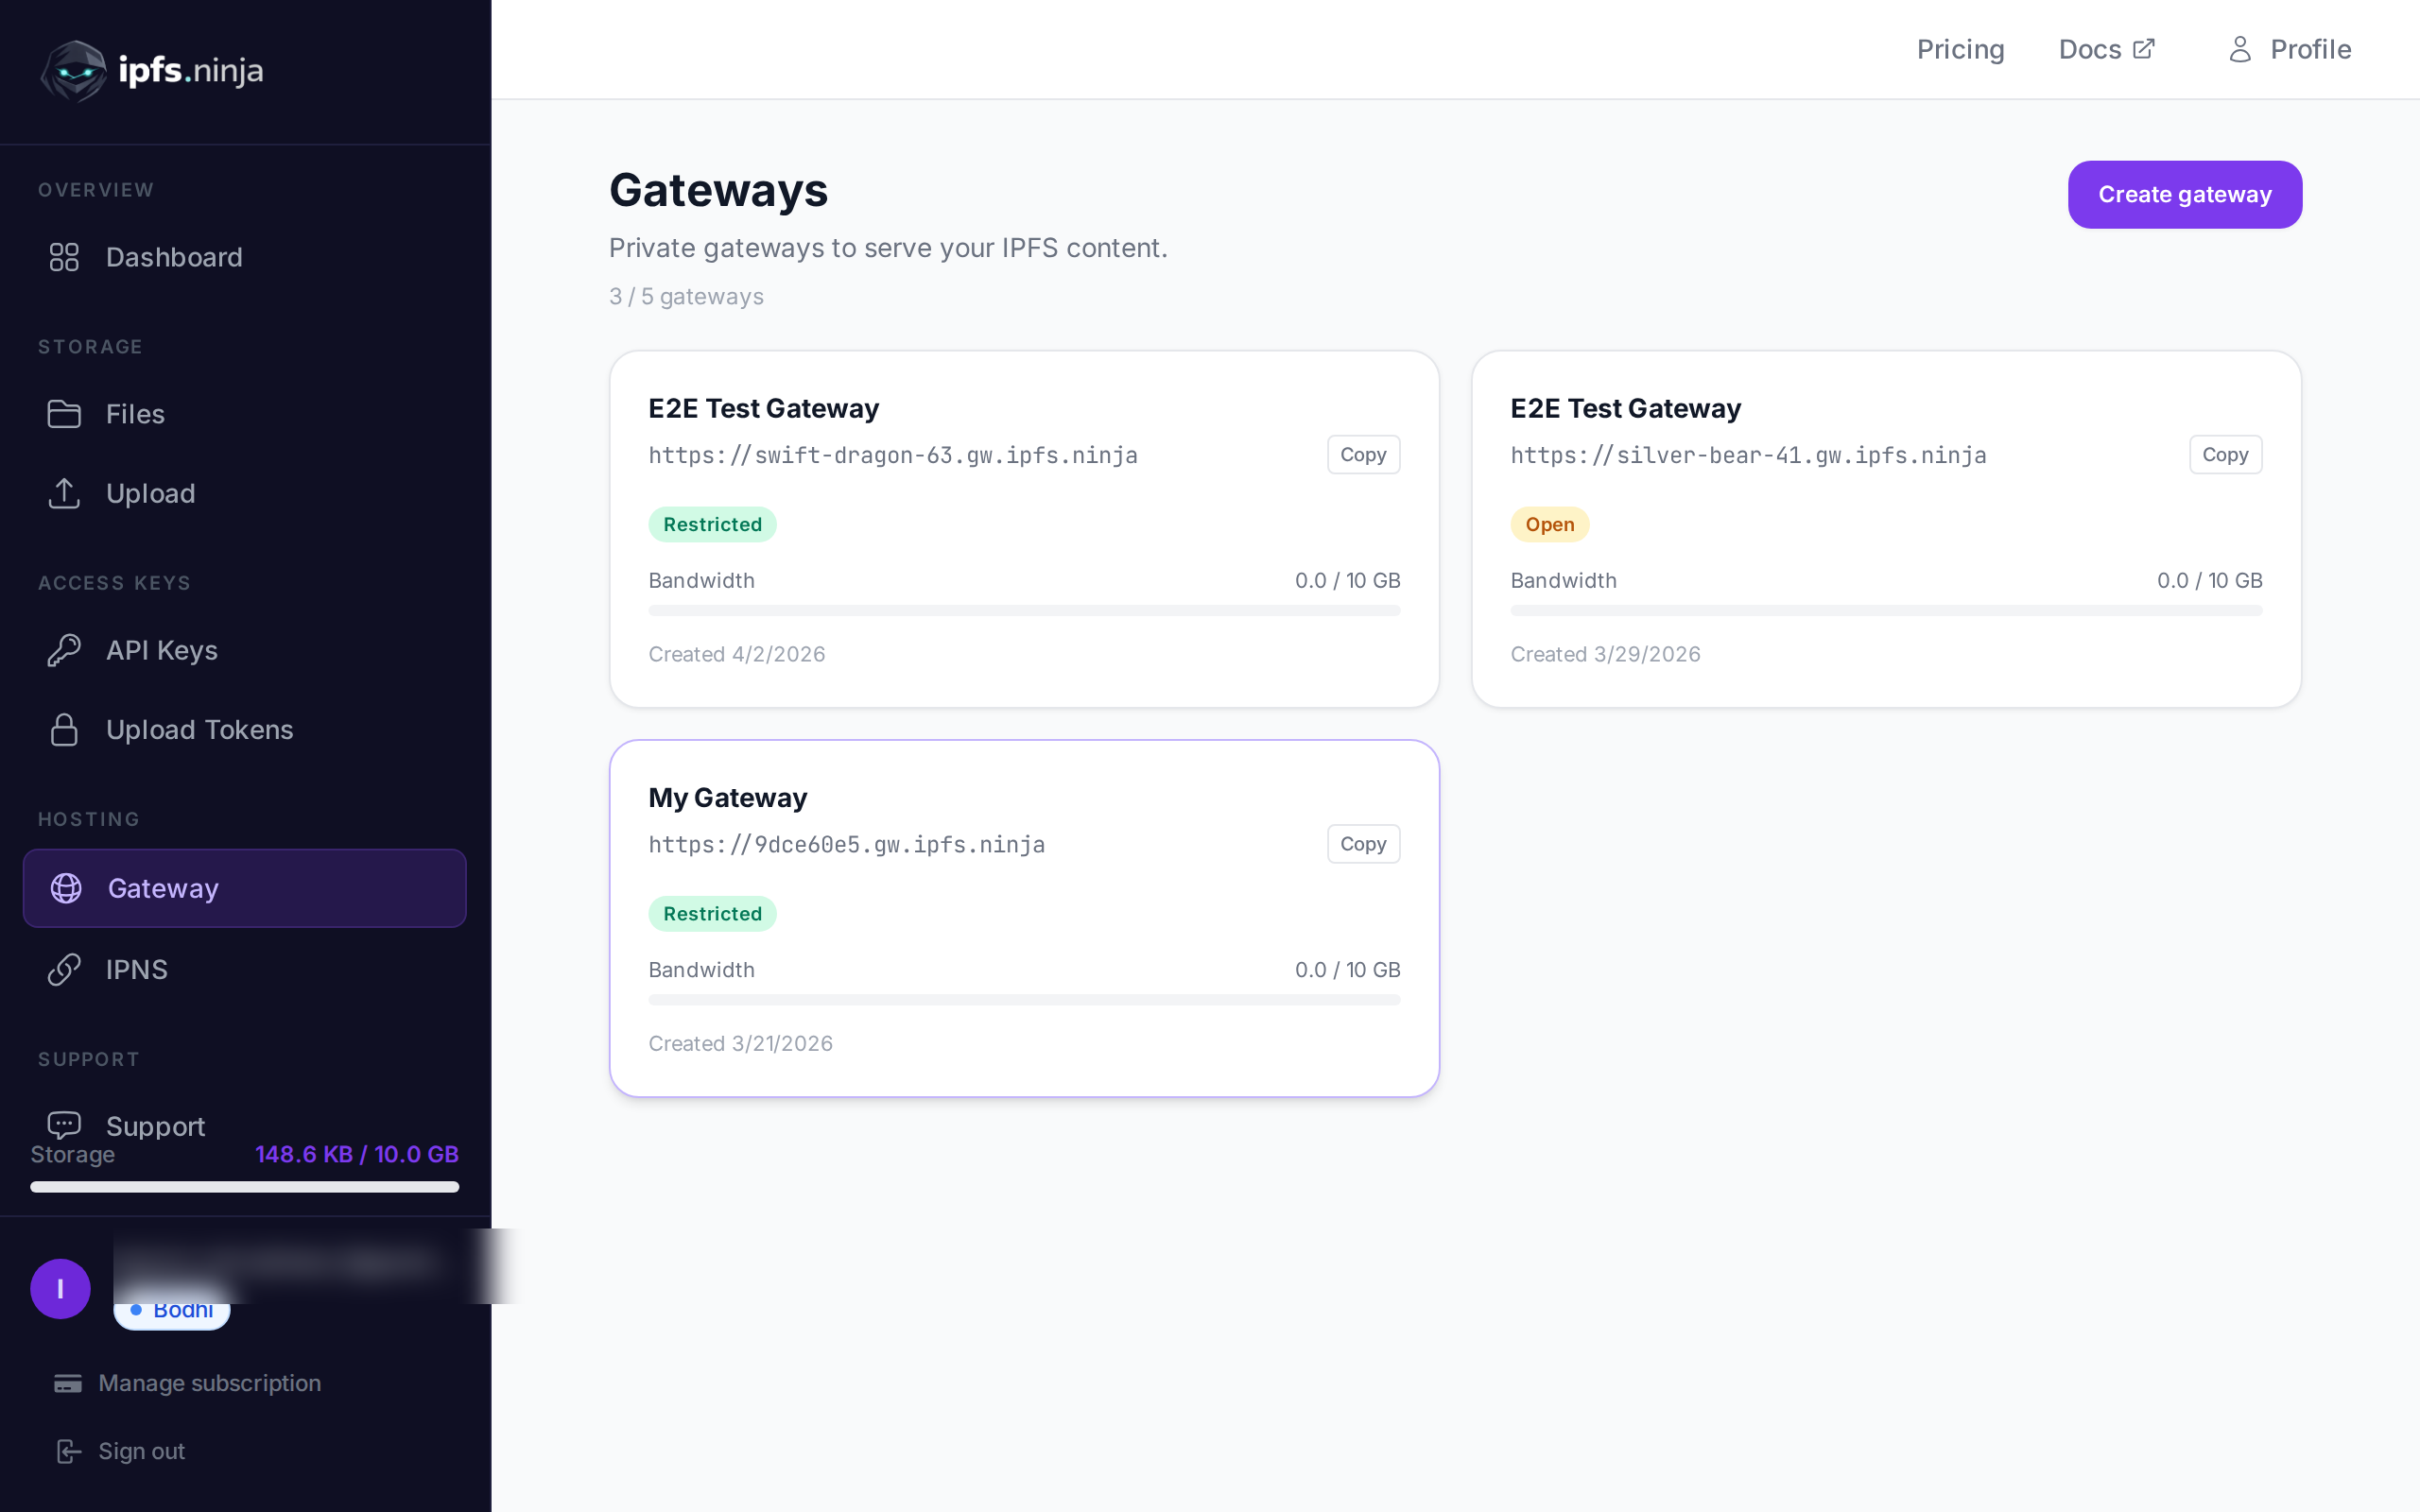
IPFS Ninja provides a dedicated custom gateway on every paid plan (Bodhi, Karma, Nirvana), each with configurable access controls:
// Configure a restricted gateway
const setupGateway = async () => {
  const response = await fetch('https://api.ipfs.ninja/gateways', {
    method: 'POST',
    headers: {
      'Content-Type': 'application/json',
      'X-Api-Key': 'bws_1234567890abcdef1234567890abcdef'
    },
    body: JSON.stringify({
      slug: 'my-app',
      accessMode: 'restricted',
      allowedOrigins: ['https://myapp.com'],
      ipWhitelist: ['203.0.113.0/24']
    })
  });

  return await response.json();
};
Your files are then accessible at https://my-app.gw.ipfs.ninja/ipfs/{CID} with the access restrictions you’ve defined.
Developer Experience: API Design and Documentation
Simple, Intuitive API
Both services offer good APIs, but IPFS Ninja’s design feels more modern and developer-friendly. Here’s a side-by-side comparison of uploading a file:
IPFS Ninja:
const upload = async (content) => {
  const response = await fetch('https://api.ipfs.ninja/upload/new', {
    method: 'POST',
    headers: {
      'Content-Type': 'application/json',
      'X-Api-Key': 'bws_1234567890abcdef1234567890abcdef'
    },
    body: JSON.stringify({
      content: content,
      description: 'My file',
      metadata: { app: 'my-app', version: '1.0' }
    })
  });

  const { cid, sizeMB, uris } = await response.json();
  console.log(`Uploaded: ${uris.url}`);
};
Pinata (for comparison):
const FormData = require('form-data');

const upload = async (content) => {
  const form = new FormData();
  form.append('file', content);
  form.append('pinataMetadata', JSON.stringify({
    name: 'My file'
  }));

  const response = await fetch('https://api.pinata.cloud/pinning/pinFileToIPFS', {
    method: 'POST',
    headers: {
      'Authorization': `Bearer ${JWT_TOKEN}`
    },
    body: form
  });

  const { IpfsHash } = await response.json();
  console.log(`Uploaded: https://gateway.pinata.cloud/ipfs/${IpfsHash}`);
};
IPFS Ninja’s approach is cleaner—no FormData manipulation, native JSON support for both text and binary content (via base64), and a more predictable response structure.
Enhanced Analytics and Monitoring
IPFS Ninja provides detailed analytics that help you understand your usage patterns:
// Get analytics for your files
const getAnalytics = async () => {
  const response = await fetch('https://api.ipfs.ninja/analytics/files', {
    headers: {
      'X-Api-Key': 'bws_1234567890abcdef1234567890abcdef'
    }
  });

  const analytics = await response.json();
  console.log(`Total requests: ${analytics.totalRequests}`);
  console.log(`Bandwidth used: ${analytics.bandwidthMB} MB`);
};
These insights help you optimize your usage and understand how your content is being accessed.
Advanced Features for Growing Teams
Image Optimization
IPFS Ninja includes built-in image optimization that’s separate from the gateway system:
// Upload an image
const uploadImage = async (imageFile) => {
  const response = await fetch('https://api.ipfs.ninja/upload/new', {
    method: 'POST',
    headers: {
      'Content-Type': 'application/json',
      'X-Api-Key': 'bws_1234567890abcdef1234567890abcdef'
    },
    body: JSON.stringify({
      content: await fileToBase64(imageFile),
      description: 'Profile picture'
    })
  });

  const { cid } = await response.json();

  // Access optimized versions
  const thumbnailUrl = `https://api.ipfs.ninja/image/${cid}?w=150&h=150&fit=cover`;
  const webpUrl = `https://api.ipfs.ninja/image/${cid}?format=webp&quality=80`;

  return { cid, thumbnailUrl, webpUrl };
};
This eliminates the need for separate image processing services.
Pinning Existing Content
Both services allow you to pin existing IPFS content, but IPFS Ninja’s API is straightforward:
const pinExisting = async (cid) => {
  const response = await fetch('https://api.ipfs.ninja/pin', {
    method: 'POST',
    headers: {
      'Content-Type': 'application/json',
      'X-Api-Key': 'bws_1234567890abcdef1234567890abcdef'
    },
    body: JSON.stringify({
      cid: cid,
      description: 'Pinned from external source'
    })
  });

  return await response.json();
};
Migration: Making the Switch
If you’re considering switching from Pinata to IPFS Ninja, the process is straightforward. Since IPFS content is addressed by CID (Content Identifier), your existing files remain accessible—you just need to re-pin them to IPFS Ninja.
Here’s a simple migration script:
const migratePins = async (existingCids) => {
  const results = [];

  for (const cid of existingCids) {
    try {
      const response = await fetch('https://api.ipfs.ninja/pin', {
        method: 'POST',
        headers: {
          'Content-Type': 'application/json',
          'X-Api-Key': 'bws_1234567890abcdef1234567890abcdef'
        },
        body: JSON.stringify({
          cid: cid,
          description: 'Migrated from Pinata'
        })
      });

      if (response.ok) {
        results.push({ cid, status: 'success' });
      } else {
        results.push({ cid, status: 'failed', error: await response.text() });
      }
    } catch (error) {
      results.push({ cid, status: 'error', error: error.message });
    }
  }

  return results;
};
Real-World Use Cases
NFT Projects
For NFT projects, reliable pinning and global accessibility are crucial. IPFS Ninja’s multiple gateways and competitive pricing make it attractive for creators:
const uploadNFTMetadata = async (metadata, imageFile) => {
  // Upload image first
  const imageResponse = await fetch('https://api.ipfs.ninja/upload/new', {
    method: 'POST',
    headers: {
      'Content-Type': 'application/json',
      'X-Api-Key': 'bws_1234567890abcdef1234567890abcdef'
    },
    body: JSON.stringify({
      content: await fileToBase64(imageFile),
      description: `NFT Image: ${metadata.name}`,
      metadata: { type: 'nft-image', collection: metadata.collection }
    })
  });

  const { cid: imageCid } = await imageResponse.json();

  // Upload metadata with image reference
  const metadataWithImage = {
    ...metadata,
    image: `ipfs://${imageCid}`
  };

  const metadataResponse = await fetch('https://api.ipfs.ninja/upload/new', {
    method: 'POST',
    headers: {
      'Content-Type': 'application/json',
      'X-Api-Key': 'bws_1234567890abcdef1234567890abcdef'
    },
    body: JSON.stringify({
      content: JSON.stringify(metadataWithImage),
      description: `NFT Metadata: ${metadata.name}`,
      metadata: { type: 'nft-metadata', collection: metadata.collection }
    })
  });

  return await metadataResponse.json();
};
Decentralized Applications
DApps benefit from IPFS Ninja’s upload tokens for secure client-side uploads:
// React component example
const FileUploader = () => {
  const [uploadToken, setUploadToken] = useState(null);

  useEffect(() => {
    // Fetch upload token from your backend
    fetchUploadToken().then(setUploadToken);
  }, []);

  const handleFileUpload = async (file) => {
    if (!uploadToken) return;

    const response = await fetch('https://api.ipfs.ninja/upload/new', {
      method: 'POST',
      headers: {
        'Content-Type': 'application/json',
        'Authorization': `Signed ${uploadToken}`
      },
      body: JSON.stringify({
        content: await fileToBase64(file),
        description: file.name
      })
    });

    const result = await response.json();
    console.log('File uploaded:', result.uris.url);
  };

  // ... rest of component
};
When Pinata Might Still Be Right
To be fair, Pinata remains a solid choice for certain scenarios:
- Large enterprise teams that need extensive user management features
- Projects with complex compliance requirements that benefit from Pinata’s longer track record
- Teams already deeply integrated with Pinata’s ecosystem and tooling
The choice isn’t always about price—it’s about finding the right fit for your specific needs.
Performance and Reliability
Both services offer reliable IPFS pinning, but IPFS Ninja’s multiple gateway options provide additional redundancy. The service uses a global network of IPFS nodes to ensure your content remains accessible.
For performance comparison, you can check our detailed analysis in IPFS Ninja vs Pinata and our comprehensive guide to the best IPFS pinning services.
Getting Started with IPFS Ninja
If you’re ready to try IPFS Ninja, here’s how to get started:
- Sign up for a free Dharma account
- Generate your API key in the dashboard
- Start uploading with the simple API
- Upgrade to Bodhi, Karma, or Nirvana as your storage and bandwidth needs grow
For a complete tutorial, check out our IPFS upload API tutorial and how to upload files to IPFS guides.
The Bottom Line
The switch from Pinata to IPFS Ninja often comes down to value. At $5/month for 10 GB versus $20/month for the same storage, IPFS Ninja provides 4x better value while adding features like upload tokens, multiple gateways, and built-in image optimization.
For small teams, indie developers, and growing projects, this pricing difference isn’t just significant—it’s often the difference between being able to afford professional IPFS hosting or not.
IPFS Ninja isn’t trying to replace every use case for Pinata, but for developers who need reliable, affordable IPFS pinning with modern developer tools, it’s become the clear choice.
Ready to start pinning? Create a free account — 50 files, 1 GB storage, 2 GB bandwidth/mo. No credit card required.